
SUBSCRIBE
  • Home
  • Watch
  • 2024 Event
    • General Info
    • Presenters & Speakers
    • Tickets
    • Get in Touch
    • FAQ
  • Shop
  • TOPICS
        • CONCERNS

          • Frizz
          • Hair Growth
          • Hair Loss
          • Regimen
          • Scalp Care
        • CURL CARE

          • Braids & Protective Styles
          • Color
          • Haircuts
          • Hairstyles
          • Locs
          • Straightening
          • For Kids
          • For Men
        • LIFESTYLE

          • Business
          • Celebrities
          • Trends
  • PRODUCTS
    • Top Products
    • Cleansing
    • Ingredients
    • DIY Products
    • Hair Tools
    • Moisturizing
  • TEXTURE
        • FINE (1A-1C)
          Straight with minor waves.
        • WAVY (2A-2C)
          Forms a loose “S” very easily straightened
        • CURLY (3A-3C)
          Forms a definite “S” shaped like a corkscrew
        • COILY (4A-4C)
          Very tight curl when stretched creates an “S”
        • LOCS
          Hair intentionally matted to form "ropes"
        • QUIZ
          Take our quiz to learn your curl pattern
      • 1a
        1b
        1c
        2a
        2b
        2c
        3a
        3b
        3c
        4a
        4b
        4c
        Locs
        Discover your curl pattern, the best hairstyles and products just for you!
        Take the quiz now
  • TEXTURE TALES
  • TEXTURE ON THE RUNWAY
  • LEADERS IN CURL
  • BEST OF THE BEST 2024
  • ASK A CURL EXPERT
  • GET INVOLVED
Home • Wavy

Easiest Tucked French Braid Tutorial... Ever

Share this Article
Getting your Trinity Audio player ready...
Easiest Tucked French Braid Tutorial… Ever
By ToellaP · Updated October 28, 2014

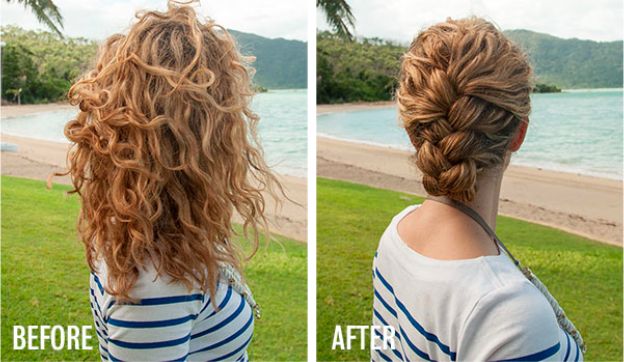
tucked french braid

The classic, chic tucked French Braid may take you a little while to perfect, but continue to practice and do not be afraid to vary slightly from the directions if your hair requires that!

You will need

  • Small elastic hair ties

  • Bobby pins

  • Hairspray

  • Patience (2 minutes”>

Directions

  1. Start with detangled hair that will be relatively easily manipulated.

  2. Split all hair into three equal sections at your hairline

  3. Begin braiding by crossing the right piece over the middle, then the left over the middle

  4. As you continue to braid, add hair from each respective side into the braid. Try to do this so this loosely but not too messily. This takes finesse, but it will come with practice and patience.

  5. When you have reached the end of the braid, tie it with the small elastic hair tie.

  6. Tuck the end of the braid under the base of the braid and secure with bobby pins in an X formation

Two optional steps
If the look ends up too messy for your liking use hairspray and bobby pins to secure the loose hairs either behind your ear or in your braid. Add bows or flowers to the middle or top of the braid.

Watch the video

Thanks to the talented Hair Romance for the inspiration!
Read More

Leaders In Curls: Donna's Recipe
Leaders In Curl
Leaders In Curls: Donna's Recipe
Manestays: Bomb Ass Fro Banana and Algae Deep Conditioner
Curl Products
Manestays: Bomb Ass Fro Banana and Algae Deep Conditioner
Manestays: The DOUX CRAZYSEXYCURL Honey Setting Foam
NaturallyCurly
Manestays: The DOUX CRAZYSEXYCURL Honey Setting Foam
Manestays: Bounce Curl Red Define Edgelift Brush
Curly
Manestays: Bounce Curl Red Define Edgelift Brush
A Step-By-Step Guide To Creating Peekaboo Highlights With Clip-Ins
Shop
A Step-By-Step Guide To Creating Peekaboo Highlights With Cl...
Company Information
  • Customer Service
  • Contact Us
  • Privacy Policy
  • Terms of Service
  • ACCESSIBILITY STATEMENT
Subscribe
  • Newsletters
FOLLOW US
  • Home
  • Watch
  • 2024 Event
    • General Info
    • Presenters & Speakers
    • Tickets
    • Get in Touch
    • FAQ
  • Shop